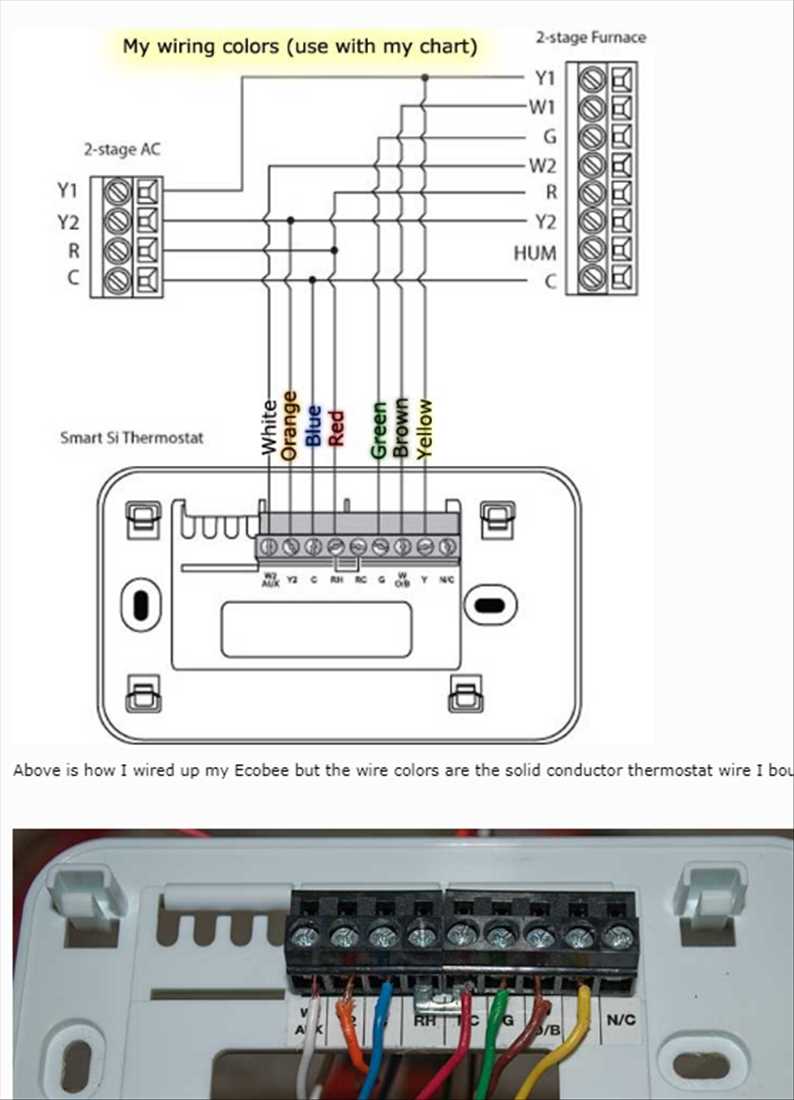
To ensure a smooth installation and proper functioning of your smart thermostat, start by confirming whether your system has a common wire (C-wire). Without a C-wire, the system may not have a stable power supply, which could lead to frequent malfunctions or draining of the device’s battery. If your HVAC system does not include this wire, a power extender kit is often available to bridge the gap.
Next, carefully examine the terminals of your system’s control board. The connection points for heating, cooling, and fan systems must be wired to the appropriate terminals. For instance, the “R” terminal is typically used for the power supply, while the “W” terminal is designated for heating systems, and “Y” connects to cooling. Always double-check your wiring configuration to avoid damaging the system or causing a malfunction.
If you are using auxiliary or emergency heating, ensure these systems are wired correctly to the “E” or “AUX” terminals. Misconnections may prevent these systems from activating when required. Be sure to consult your device’s manual for the exact wire configuration based on your heating and cooling system’s needs.
Finally, after installation, test the system thoroughly. Check the display for error messages and ensure that the thermostat is reading and controlling your home’s temperature accurately. If issues persist, revisit the wiring steps, or consider seeking help from an experienced professional.
Ecobee Enhanced Wiring Setup
Before starting, ensure your HVAC system has a common wire (C-wire) for consistent power to your device. If your system lacks this wire, consider using a power extender kit to provide continuous voltage. This step is crucial for maintaining a stable connection and preventing the device from losing power intermittently.
Begin by identifying the terminals on the control board of your system. Label them as you disconnect the old thermostat, taking care to connect each wire to its designated terminal. For example, the “R” terminal typically handles the power input, “Y” connects to the cooling system, and “W” is linked to the heating system. Pay close attention to the color coding to avoid mistakes.
Ensure that the “C” terminal on your new thermostat is connected to the common wire in your system. If you don’t have one, use the provided adapter or kit to establish the correct connection. This will help the device operate smoothly and avoid relying on battery power alone.
If you are using additional systems such as auxiliary or emergency heat, wire these to the correct terminals, usually labeled “E” or “AUX.” Incorrect connections here may cause heating elements to fail to activate when needed. Always follow the guide specific to your unit for the correct wiring order.
Once all connections are made, carefully mount the thermostat onto its base and secure it. It’s important to double-check each connection before powering on the unit. Test the system by adjusting temperature settings and confirming that each system (heating, cooling, fan) responds appropriately.
If the thermostat is still not functioning as expected, try resetting the system or consulting the troubleshooting section of the manual. If issues persist, contact a licensed HVAC technician to assist with resolving potential issues in the system or connections.
How to Connect the Thermostat with a C-Wire
Start by turning off the power to your HVAC system at the main circuit breaker. This step is vital to avoid any electrical hazards during installation. Verify that the power is off by checking the current thermostat to ensure it’s no longer functioning.
Locate your existing thermostat and remove the cover to expose the wires behind it. Take a picture of the connections to ensure you can correctly reconnect the wires. If the existing system lacks a common wire (C-wire), you will need to install one or use an adapter that connects the common wire from the HVAC system.
Next, examine the control panel of your HVAC system, typically found near the furnace or air handler. Check for an available terminal labeled “C” for the common wire. If the system does not have a dedicated common wire, you may need to run an additional wire from the control panel to the thermostat location.
If there is already a C-wire available, connect it to the corresponding terminal on the new thermostat. Use a wire stripper to remove a small section of insulation from the C-wire and ensure that it is securely connected to the correct terminal. Double-check the wiring setup before moving forward.
If no C-wire is available, use a power extender kit. These kits usually include an adapter that connects the existing wires to a C-wire, ensuring your device receives continuous power. The adapter should be installed in the control panel of the HVAC system, and it will route power to the thermostat even without a direct common wire.
After all connections are made, mount the thermostat to the wall, ensuring it is securely fastened. Attach the device to the base, and check for any loose connections or wires. A secure fit ensures proper operation and avoids potential issues with power transmission.
Once the thermostat is installed, turn the power back on at the breaker. Test the device by adjusting the settings to verify that it receives power and operates the HVAC system as expected. Make sure that all functions such as heating, cooling, and fan operation respond correctly.
If the system does not work as expected, verify all connections again. If there is no power, check the fuse and connections in the HVAC control panel. If issues persist, consider contacting a professional technician to assist with troubleshooting or installing the common wire if needed.